Showing posts with label how to. Show all posts

Tuesday, 8 April 2014

DIY Easy Flower Accessories - Floral Crown


The first in a series of 3 easy diy organza flower accessories for Sew Mama Sew by Fairytale Flower is this ethereal yellow flower crown.


 All three tutorials are based on the peony organza flower tutorial found HERE.


Once you've mastered making your flowers you can then make a number of easy flower accessories that you can wear year-round -on special occassions or every day- and be proud of.


You can find the tutorial on how to make this flower crown HERE.


I would LOVE to see what you make.
Please feel free to share your lovely creations with me. 


Fairytale Flower DIY


Yes, I have been rather absent from this blog lately but I have not been idle....

The photo collage above is a sneak peek into a diy project I've been working on for Sew Mama Sew blog which I've enjoyed thoroughly and can't wait to share with you.

Come back later for a series of easy diy floral accessory tutorials: a floral crown, a flower wrist corsage and a flower headband.

Thursday, 13 March 2014

How To Make A Peony Fabric Flower


 Would you like to find out how to make your very own fabric flower? 
Would you like to make a pretty peony flower for your all your diy floral accessories?
Then look no futher.

I had the pleasure of preparing just that for one of my very favourite blogs: Sew Mama Sew and I'd love to share it with you all.


I first started making flowers a couple of years back when my sister discovered a tutorial for it on the internet. Her stumbling upon that tutorial was one of the happiest accidents in my life as it's given me a passion for making pretty flowers that brighten my days and fills my soul with the joy of creating.
(I wish I knew which one it was so I could share it with you today....)


Ever since I've had a genuine affection for tutorials and their creators.
I greatly admire the people who so generously give up their time and knowledge to show others these skills and inspire them, in turn, into creation.


I've always meant to make tutorials and share the things that I love to make but time is always a factor in this not coming around as often as I'd like.

I will promise to try harder and actualy make all those tutorials I have floating in my head to share with you.

For now, please head over to Sew Mama Sew for the full account of How To Make A Peony Fabric Flower.

I would love to see what you make from this tutorial and I'd love to share it on the blog too.


Sunday, 28 April 2013

How To Make Fabric Flowers - a DIY Tutorial


This is a picture tutorial on how to make your very own, easy but fabulously pretty fabric flowers. 
In three different versions.


Just follow the step by step instructions.


These are the three different versions of the flower:


The cut of your petals decides the resulting look.


 Step 1. To make one flower, cut at least 9 circles of fabric, all in the same size and give 8 of them the shape you prefer. (The 9th petal will be used as your base and you need that circular.)


Tip: The more petals you add, the fuller the resulting flower.


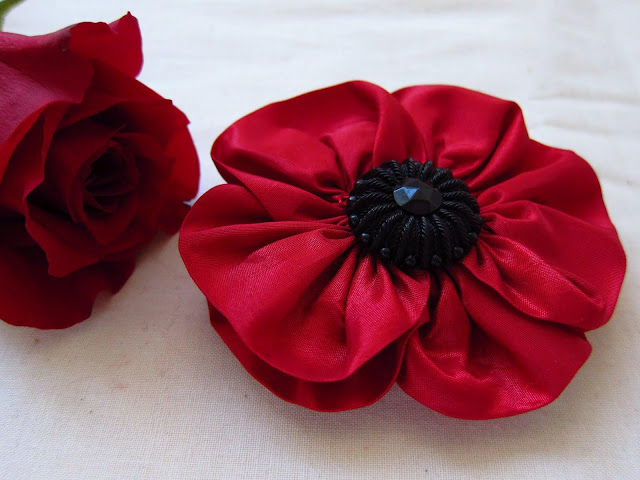
 A simple circle gives you this flower.


A simple circle cut with pinking shears gives you this flower.

A star shaped petal gives you this flower.
  Step 2: Take the circle of your fabric designated as the base. You will be sewing all the flower petals on this base, one by one as shown in the following pictures.

Tip: You can use any fabric of your choice for the base.
Choose the base according to your needs. 
For example, a thin fabric choice for the flower might need the base to be sturdier for a  better result.


Step 3. Fold all your petals in half and then in half again, until you get the folded 'quarter' petal shown in the pictures. 
(Four of these 'quarters', will make up one layer of petals.)

Step 4. Proceed to sew four of them onto the centre of your base -as shown in the pictures- one by one until they have filled the four quarters of your base circle.

I found that they are sewn on more symmetricaly if you sew the second petal  opposite the first petal.


Then continue sewing the third petal and fourth petals in the two gaps left by the previous two petals sewn opposite each other.


Step 5.When the first layer of petals is sewn on, you need to sew one more layer on top of that to complete your flower.


You do the same thing as in the previous layer of petals and sew four more folded petals on top.


Try to position them slightly rotated, by half a petal, over the original petals. 
This will discourage gaps in the finished flower.


If your fabric is a bit hard to handle or if this your very first flower, you might need the help of some pins keeping the lower layer of petals in order, ie out of your way....


When you sew in the very last of your petals, your flower will look something like this.

Congratulations!
You've done it!


Now you can use your lovely handmade flower in any number of ways.
You can make your very own fabric flower accessories, sashes, headbands,hair clips,  pins, brooches, shoe clips, wrist corsages, garlands, table decor -the sky's the limit really!

They make great last minute gifts too, as they are so easy to make.

I added a brooch back to these and made some spring gifts I needed in a pinch.


Last but not least, they also make great Mother's Day gifts. 
How can you beat flower keepsakes that will last and be cherished for a long time!
Especially if there are little hands involved in the making.
 This could be a great project to ease kids into sewing or if you want a more child-friendly version, you could use glue to secure the petals onto the base.

 Extra tips and notes:
The fabric I've used here is a vibrant coral synthetic fabric which doesn't fray. 
These would look great in felt or any non-fraying material but I've made them in natural cotton as well -which frays fatser than you can look at it- and I loved that look too.
Just decide what works for you and the rest is easy.


If you have any questions, don't hesitate to ask in the comment section below and I'll get back to you.


Linked to:

Friday, 30 November 2012

How To Make A Simple Scarf - a DIY for Absolute Beginners


This step by step instructions tutorial on how to make a simple scarf is for absolute beginners. 
While the scarf in the photos is a small square scarf, the steps are the same for any shape and size you would like to make.


1. Decide on your fabric and shape.
(This tutorial is basically for fabrics that fray, like cotton, linen, etc when you want to have a neat, stitched finish.) 
If you want a perfectly square scarf, and you don't want to get out your tape measure, just  fold your fabric over until you make a perfect triangle. 
Cut. 
Open it up, it's a perfect square.


 2.If you're pretty new at this and are not confident of your sewing skills, or if you just want everything super neat and tidy, it helps if you use an iron to flatten out all your seams before you stitch them.
This is how you do it.
Fold over a thin strip of fabric making sure that it's the same width all the way down. Press this down with your iron untill flat. 


 Once you've done this, fold it over again, in the same way, and press it flat with the iron again.
Do this for each side.


3. Stitch over all sides paying attention to the corners.


 Use pins to keep the fabric in place and help you make them align perfectly.


Tip: When stitching something that will see a lot of wear, backstitch a little so that you don't have unravelled stitches later.


4.Congratulations!
You have just made your very own scarf!
Now you can go ahead and make some more for your friends and family! 
 They make for cute Christmas gifts.


Linked to:

Saturday, 11 August 2012

Top Ten (plus 1) Pinterest Flower DIY Tutorials

I will readily admit to a flower hang up.
 I love them all. 
Whether natural, fabric, paper or even plastic, they still fascinate me.
Simple or intricate, once again, I admire them in equal measure.

So here is a top 10 of the wonderful flower tutorials floating around Pinterest  -and currently on my DIY Board- in random order and in a variety of media.

Just click on a picture to go to the link.


I hope you like them.


Sunday, 6 May 2012

Related Posts Plugin for WordPress, Blogger...