Showing posts with label diy. Show all posts

Wednesday, 31 October 2018

Pinata Party!


I've been making these colourful pinatas for birthday parties lately. 
They're always such a hit with the children - as well as the adults. 
And they're such fun to make!

Tuesday, 25 September 2018

Tassel Inspiration


 Having fun looking looking through old craft magazines and unearthing 'mythical treasure'....


Friday, 6 April 2018

Grey Flower Appliques


These measure roughly an inch and a half or about 4cm across. Ready to be added to any number of DIY projects.

Monday, 19 December 2016

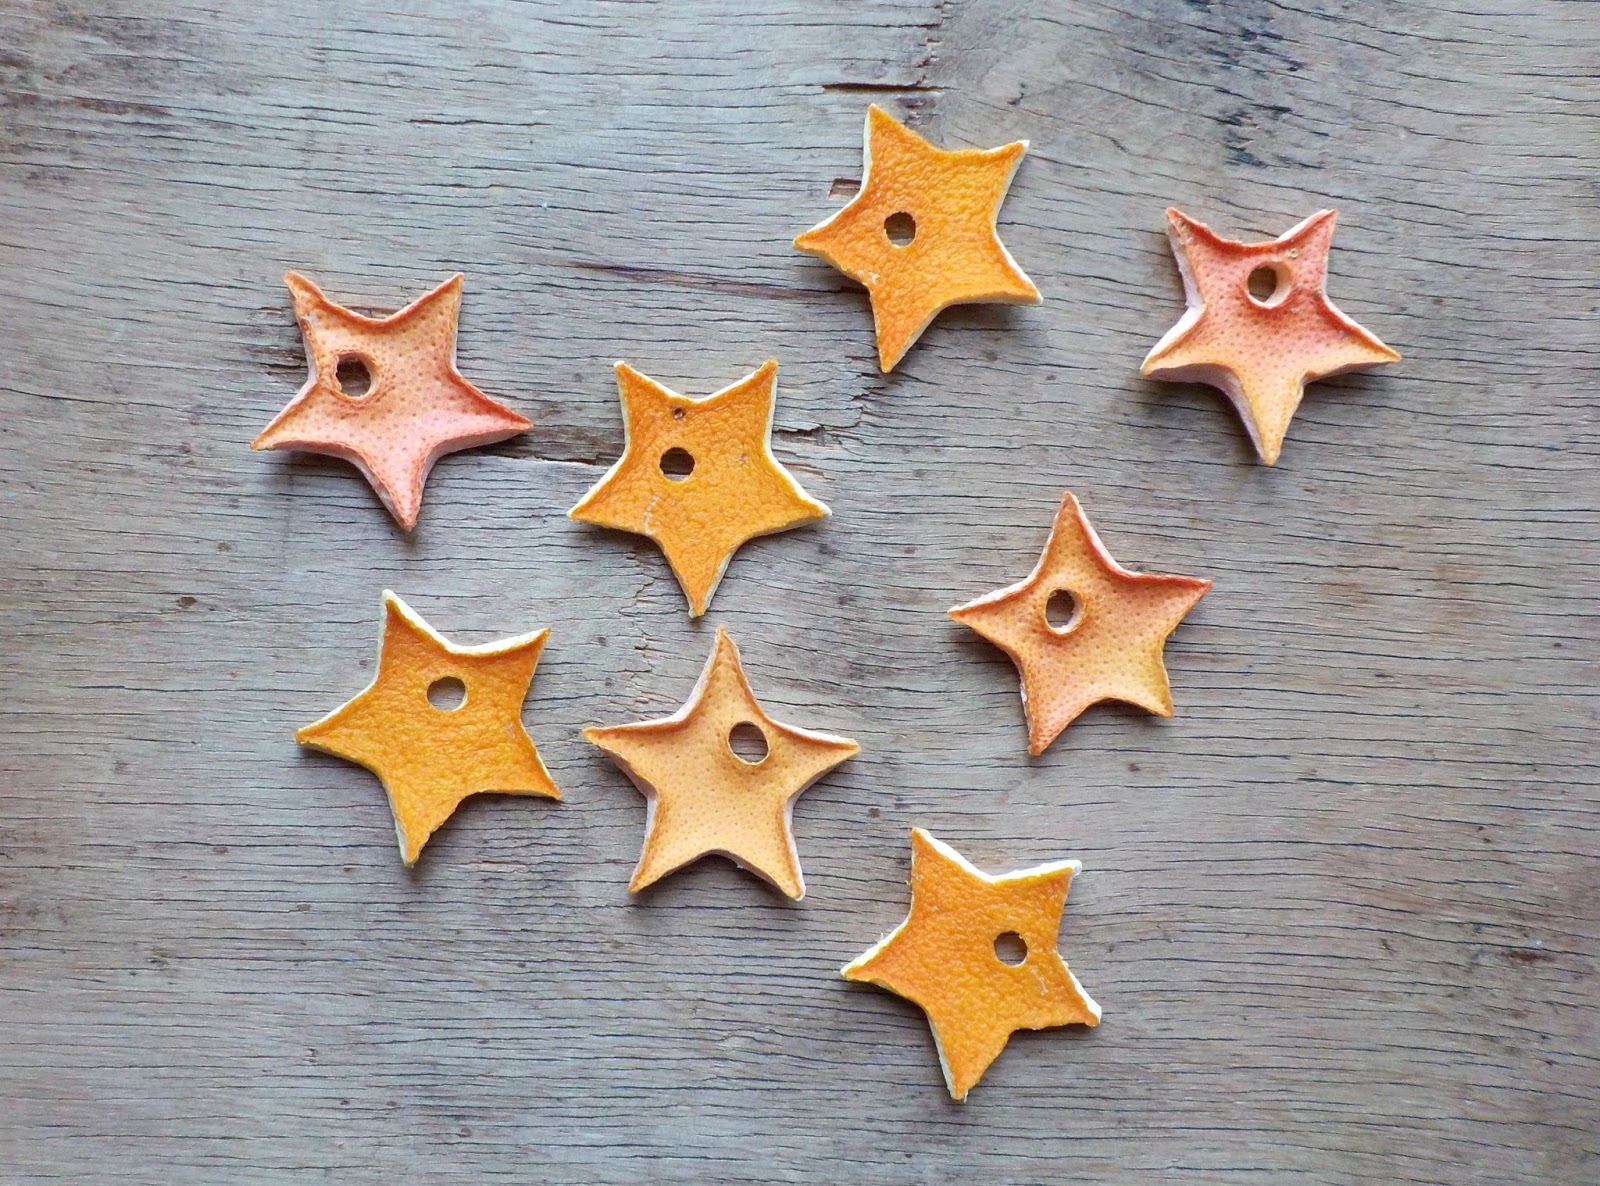
Making Citrus Stars


 We started making citrus stars a couple of days ago and it was unanimously declared one of the best crafts we've done in a while. We absolutely loved it!
It was quick and it was fun and the aroma of the fragrant peel makes it a thoroughly pleasant and very festive diy. 


We had pink grapefruit and oranges on hand so that's what we used to make ours.
Can you tell which is which?

  
The ones above are from orange peel and you can probably tell that they're only half dried. The ones below are the pink grapefruit ones and they are thoroughly dried out. I adore the amazing, delicate, pink-orange hues!!


They're so fragrant and beautiful you just feel like making them again and again.

The inspiration for the citrus stars -and how to make them- came from here.


Linked to:
The Dedicated House

Saturday, 19 November 2016

DIY Santa Snow Globe


 This DIY Santa snow globe is our very first Christmas craft this year!


We usually make them with water but this year we're trying them without and I have to say that I like how the fake snow sticks to the glass and makes it look like Santa's in a blizzard.....

Linked to:

Saturday, 27 February 2016

Fragrant Stars

 totally by design

All you need to know in order to make fragrant citrus stars in one picture!

So easy and so much fun that I added it to my Kids Craft & Activities board on pinterest.
A perfectly crafty way to spend a Saturday afternoon with a little one.

Thursday, 10 December 2015

DIY Advent Calendar Step by Step Tutorial

Looking for an easy DIY advent calendar to make yourself?
This one is easy, uses only readily available material and it won't break the bank.
It's also fun to do together with the kids.


The materials you will need are:
-Craft paper (Or any kind of paper that is not too thick and not too thin. Recycling paper bags -like the ones Zara has- from your shopping ventures would also work well for these.)
- Ribbon of your choice
- A marker. I used a black one but you could do it in any colour/s of your choice
- Scissors
- Glue 
- Stapler (optional)
- Lids or saucers to be used as templates for the circles drawn within each circular paper.
- A hanger or maybe a piece of driftwood, a stick or anything that you could hang these on. You could even skip the hanging option because these could be hung practicaly anywhere. Even on the Christmas tree itself.


First you need to draw 48 same-size circles on your paper. 
Each finished circle pouch is actually a pocket so you need 2 circles for each of the 24 days counted on the advent.


Cut them all out neatly.
I like to keep the original black circle on the outside as part of the design so I cut carefully around it.


Time to draw some circles of varying sizes on the paper circles to help with the drawing in the next step.
Find some lids or saucers that are the size you want, place them carefully on the paper (so that they are centered correctly) and trace around them with your marker.


Then comes my favourite step in the making of the advent, adding the numbers and drawing around them.
Adapt them to your personal style. Make them as similar or as different to each other as you wish, and as minimal or as detailed in design as you want.
I left the back circle of my pouches blank but you could go crazy and decorate both front and back if you like.


Now it's time to put the cicles together so we have to make the ribbon loops.
Cut out 24 pieces of ribbon for the short loop and 24 pieces of ribbon for the long loop. 
Mine measure at about 9cm or 3.5 inches for the short one and 24cm or 9.5 inches for the long one.


Take the blank back paper circle and add the little ribbon tab to the inside of it. 
You could glue it if you like but you could also use a stapler to cut down on time. (The back circle is not visible on the advent anyway, so a staple is quick and efficient and ultimately invisible.)
Just make sure that the ribbon is placed side by side as shown in the pictures above, to make the threading of the large loop into the smaller one easier when they're finished.


To attach the larger loop onto the front circle of the pouch I chose to glue it because I din't want a staple visible on the front of my circles.
If you do not mind it showing, you can staple your larger loop ribbons onto your numbered circles and save time.
Whichever method you use, make sure that the ribbon is centered onto your circle -use the number to make sure you are attaching it in the exact middle of the top- and that one end is glued directly above the other.


Now you have both front and back circles ready and you must glue them together.
Last year I just used one piece of ribbon and glued the circles shut (after I filled them with their designated content). That meant that the circles had to be ripped apart to get to the surprise inside. Admitedly, it was fun but I was also a little sad that all my hard work was being thrown away.....
So this year I made the circles into pouches so that the advent can be re-used next year -and hopefully the year after that.
This is the step that turns the circles into pouches so if you just want to glue these together and have a little round 'pillow' that can be hung, skip the step shown in the pictures and just glue the circle shut. Don't forget to fill it first though.
If you prefer the re-usable version, turn the numbered circle around and on the back of it mark an area that will be the opening and will remain unglued.
It has to be fairly large so that you can put in and take out of the pouch anything from a piece of paper to a small piece of candy or trinket.
Now put glue around the edge of the rest of the circle and then press the back circle onto it, making sure the tabs ,as well as the two circles themselves, align.


Once you're finished with all the glueing together of circles, you have a 24 day advent to fill as you please!


The pictures above show you how to loop one tab into the other so that the pouch closes securely and can be hung.


I played around with some hanging options and finally settled on the simplicity of a wire hanger.
I thought of just using pegs to clip the pouches on but decided to keep it as uncluttered as possible so I decided to make the hanger itself open and close.


I used wire clippers to cut through the wire on the one sloping side of the hanger and with some pliers I turned the two cut ends into hooks.
This will affect the length of the one side and this in turn will affect the shape of the hanger but it can be easily rectified by bending  the bottom of the hanger a bit to make it slightly curved. 
Now you have a hanger that can be easily opened and closed every day to un-hang the day's pouch.


Before settling on the hanger option I tried out some other ideas that you can see above and below.


What do you think? 
Which would you prefer?

Wednesday, 2 December 2015

Christmas 2015 Advent Calendar


I only managed to finish this year's advent calendar in the nick of time but it's done and I'm very happy with it.
And the kid loves it, which is the point really, isn't it?!


 There are 24 circular 'pouches' that close on the top by means of ribbons and so are re-usable. 
Inside is a piece of paper with a Christmas craft or activity written on it while some may have a small piece of candy or an itsy bitsy festive toy/decoration.(The pictures are taken before the pouches were stuffed so they all lie flat.)


The pouches have two ribbon loops, one short, one long and when you thread the long one into the small one, it closes and secures the opening.


The hanger was tampered with so that I could thread the loops of all the circles through it. I just cut it open with wire cutters on one side and made two hooks that you can open and close as needed.


I made a similar one last year but I filled and then sealed shut each circle with glue, so they had to be torn open to get to the inside which was a shame really given all that work that went into making them....
That's why I made them re-sealable this year. Re-sealable means re-usable and that means less waste - and less work for hard-working mothers....


To see the step-by-step tutorial on how to make this advent calendar, click here.


Linked to:

Thursday, 5 November 2015

Easy DIY for Kids - Castanets


We had so much fun making our very own castanets the other day.
We got our inspiration here but I've seen other versions on pinterest since.


 They're super easy to make and lots of fun to play with.
All you need for each castanet is a strip of fairly sturdy cardboard and two bottle caps. 
Recycling diy at its best!


It's really easy to replicate from the pictures but I'm including instructions -because some days you'd just rather follow instructions!

1. Cut a strip of cardboard to your required measurements (ours is just over 13cm by 4cm or just over 5 inches by 1.5 inches)
2. Fold the cardboard strip in half. 
If desired, you can decorate the cardboard: draw on it, paint it or do whatever you latest craft-crush dictates.
(Alternatively, you can leave this step for after the castanets have been completed.)
3. Now you want to glue the bottle caps onto the cardboard.
If your little crafters are very little, make sure they are gluing them on the inside of the folded cardboard piece. 
Put glue on the jagged edge of one bottle cap and place it on the edge of one end of the cardboard strip. If your cardboard is the thick kind you can press the bottle cap into the cardboard for a better grip.
Let it dry.
4. Glue the second bottle cap on the other end of the cardboard strip, in the same manner. Make sure that it is aligned with the first bottle cap. You want them to click together when you're done, so they have to be positioned to correspond.
Let the glue dry.
If you've left the decorating-your-castanets part for last, now is the time to go wild and have fun with it.


That's it!
They are finished and ready to play with!
Definately a minimum effort, maximum fun kids craft.

If you are looking for more fun craft inspiration, you can find lots on my Kids Crafts pinterest board.

Friday, 2 January 2015

Easy DIY Clay Star Tutorial


 How to make easy clay star home decorations.
These are great for festive occassions but they are neutral enough to have around and enjoy all year long.


What you will need:

-clay (I used the air-drying kind)
-cookie cutter in the shape of a star
-a straw- to make the holes in the stars
-paint of your choice 
-sand paper - not too fine but not too coarse
-ribbon of your choice -to hang the stars with


Using a rolling pin, lay your clay out flat. Decide on the thickness you want your stars to be. 

TIP:Make sure that the clay is evenly rolled out if you want your stars to be all the same thickness.


Use your cookie cutter star to cut out as many stars as you wish from the clay.

TIP:When cutting out your stars with the cookie cutter, make sure you press down all the way to your work surface and gently rotate the cutter so that the clay star you have cut out is as neat as you can make it and that the edges are cleanly cut.
This will make a difference to the final look of the stars. If you want them clean cut and smooth pay attention to this step. If you want them more rustic-looking and organic in shape, then by all means be more cavalier with your cutting out of the stars.


After you have cut out all your shapes, you need to punch a little hole in each star so you can thread with ribbon to hang them.
Using a straw, place one end over the spot you want the hole to be.
Press all the way down to your surface, make a slight twisting motion,back and forth, then remove the straw with the little tube of clay trapped inside it. 
You should have a neat hole left in its place.


When you have cut out all the stars you need, let them air dry in a clean, sheltered place. 

TIP: The time it takes for the stars to dry varies on temperature and thickness. If they are in a sunny spot, they will dry up much faster than if they are in a shady, humid spot. 
I let mine sit in a sunny spot for a couple of days, making sure they were turned over two or three times.


When the stars dry, they will loose all extra moisture the clay had, so all imperfections - and cutting haste - will show magnified, like in the picture above.
So it's best to sand them to get them nice and smooth and bump free.


In this picture you can see the difference between the sanded and unsanded backs of the stars.


If you decide on sanding your stars, choose a medium weight sandpaper and sand them gently -or with more determination if you have any protruding bumpy edges you want to get rid of- until they are smooth.


When they are all sanded down, they will be completely coated in a fine powder


You must clean the stars thoroughly so you will not have trouble with the paint adhering to them in the next step.
A large brush helps in getting it all off.


Using the paint of your choice, start painting your stars.
I used an acrylic metalic gold paint.


You need to paint one side first, let it dry, paint the other side, let the other side dry and then do it again, ie paint a second coat on one side and then paint a second coat on the other side.


TIP: If the stars look exactly the way you like them, then proceed to the next step. If you feel they need an extra coat, by all means, go through the painting process one more time.


Now the stars are ready to be used in your various home decor projects or just hung around the house with a pretty ribbon!
I used an ethereal white organza ribbon to thread them on and hung a few over the kitchen window.


I also made the star mobile you can see below and that you can find HERE.


Linked to:
Maybe She Made It, Homework, The Dedicated House, Annemarie's Haakblog, I Heart Naptime

Related Posts Plugin for WordPress, Blogger...